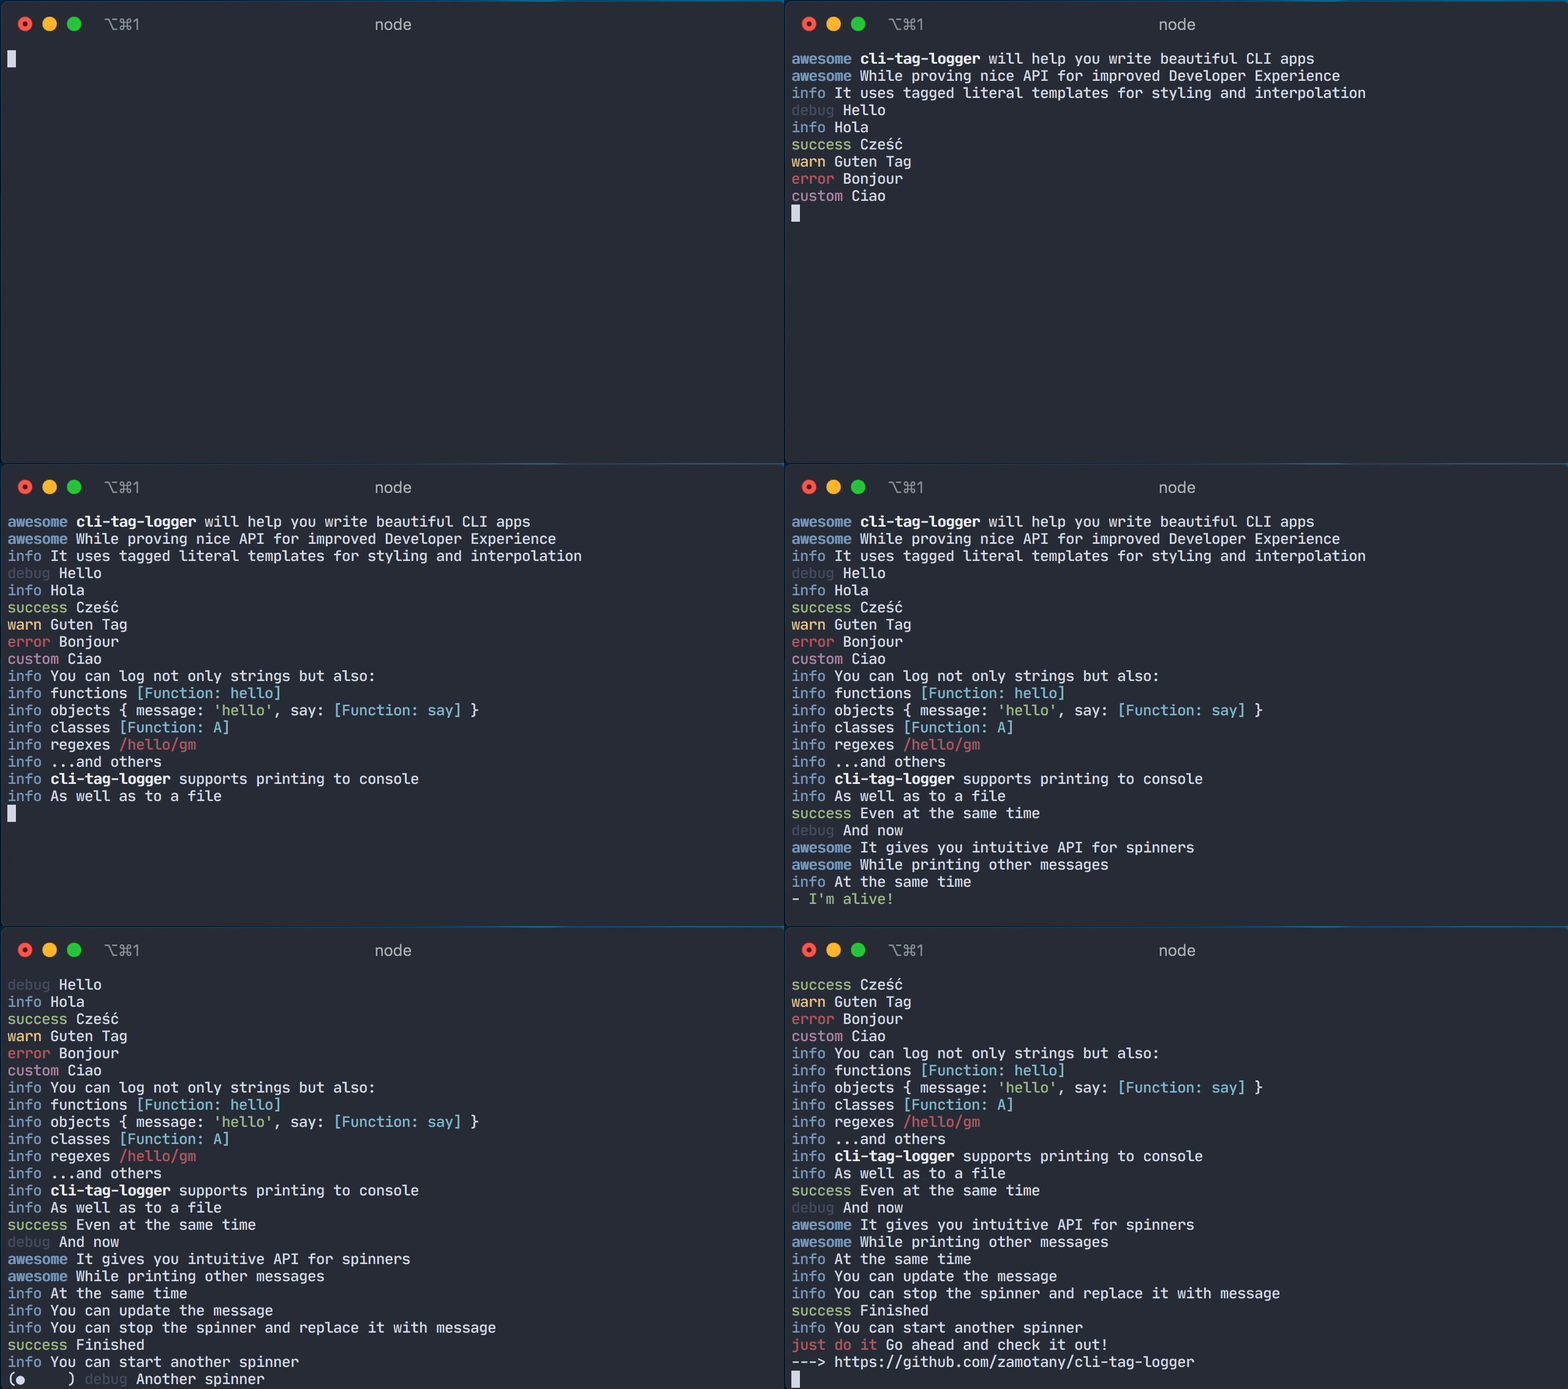
Log messages in CLI apps using tagged template literals.
Install the package:
yarn add cli-tag-loggerThen:
import * as log from 'cli-tag-logger';

log.print(log.info`Hello world`);
log.print(
  log.debug`Current env: ${{
    SHELL: process.env.SHELL,
    TERM: process.env.TERM,
  }}`
);

log.print(
  log.compose(
    log.styles.magenta`Custom message`,
    ' '.repeat(4),
    { my: 'object' },
    class A {},
    /regex/
  )
);
Result:
You can start examples from examples/ directory running:
yarn example <example_name>For instance:
yarn example spinners
Out of the box cli-tag-logger exports the following logging tags:
debuginfosuccesswarnerror
Additionally use can use:
trace- similar toconsole.traceinspect- similar toutil.inspectwith some better defaults
All of the tags return strings. You can use provided print function, but you can also use console.log, custom writer or anything you want.
If you want to have custom tag, you can use createTag function, which accepts prefix: string as a first argument and returns a tag function:
import { createTag, styles, print } from 'cli-tag-logger';

const custom = createTag(styles.cyan`custom `);

print(custom`Hello World`);cli-tag-logger uses colorette under the hood, and exposes all styling functions like green, bold, bgBlue, italic as tags functions with inspect and nesting support:
import { styles } from 'cli-tag-logger';

console.log(styles.blue`${styles.bold`Hello`}`);
console.log(styles.green(styles.underline`World`));
print function is used to print values to process.stdout. You can pass multiple values:
import { print, debug } from 'cli-tag-logger';

print(debug`Hello`, { a: 1, b: 2 });
print function should be used only if you want to write messages to process.stdout. If you wan to customize this behavior use predefined writes or create your own.
Some writers like ConsoleWriter support filter messages. You can filter messages for specific tag or exclude unwanted messages.
Writers which support filtering accept an optional filter property in their constructor:
import { info, debug, success, ConsoleWriter } from 'cli-tag-logger';

const { print } = new ConsoleWriter({
  filter: {
    exclude: 'debug',
  },
});

print('will be logged');
print(info`will be logged as well`);
print(debug`won't be logged`);
filter property accepts these properties:
only?: LevelTag | LevelTag[]- if the message matches the value at least a single value (if array is passed), the message will pass filtering and be logged (in case ofConsoleWriter)exclude?: LevelTag | LevelTag[]- if the message matches the value at least a single value (if array is passed), the message will not pass filtering and won't be logged (in case ofConsoleWriter)
If you combine both only and exclude, the message must satisfy both to pass filtering:
import { info, debug, success, ConsoleWriter } from 'cli-tag-logger';

const { print } = new ConsoleWriter({
  filter: {
    only: ['debug', 'info', 'success'],
    exclude: 'debug',
  },
});

print(info`will be logged`);
print(success`will be logged as well`);
print(debug`won't be logged`);
LevelTag can be debug, info, success, warn, error or RegExp. For custom tags (created using createTag) use RegExp:
import { createTag ConsoleWriter } from 'cli-tag-logger';

const custom = createTag('custom ');

const { print } = new ConsoleWriter({
  filter: {
    only: /^custom/,
  },
});

print(custom`will be logged`);
print(`won't be logged`);Writer class allows to customize where the messages are written. There are 3 predefined writers:
ConsoleWriter({ filter }?: { filer?: FilterConfig })- writes messages toprocess.stdout(this writer is used by exportedprintfunction); supports filteringFileWriter(filename: string, { filter, json }?: { filer?: FilterConfig; json?: boolean })- writes messages to a file; supports filteringInteractiveWriter- writes messages toprocess.stdoutand allows to draw a spinner at the bottom:startSpinner(message: string, { type, interval }?: SpinnerOptions): void- starts a spinner with a givenmessagenext to it; supports all spinners from cli-spinnersupdateSpinner(...values: ComposableValues): void- updates a message printed next to the spinnerstopSpinner(...values: ComposableValues): void- stops a running spinner and prints givenvaluesin it's place
and a single abstract class Writer.
You can compose multiple writes together using composeWriters function.
To write messages to both process.stdout and file you would need to compose both ConsoleWriter and FileWriter:
import { success, ConsoleWriter, FileWriter, composeWriters } from 'cli-tag-logger';
import path from 'path';

const { print } = composeWriters(
  new ConsoleWriter(),
  new FileWriter('output.log')
);

print(success`This will be printed in your terminal as well as in ${path.resolve('output.log')}`);
composeWriters function accepts unlimited amount of writers, but the first writer is called a main writer. All of the functions (except for print and onPrint) from the main writer will be exposed inside returned object.
Take InteractiveWriter for example - it has additional 3 methods: startSpinner, updateSpinner and stopSpinner. If InteractiveWriter is the main writer, all of those 3 functions will be available for you:
import { info, InteractiveWriter, FileWriter, composeWriters } from 'cli-tag-logger';

const { print, startSpinner, updateSpinner, stopSpinner } = composeWriters(
  new InteractiveWriter(),
  new FileWriter()
);

print(info`Hello`)
startSpinner(info`I'm spinning`);

setTimeout(() => {
  updateSpinner(info`I'm getting dizzy...`);
}, 1000);

setTimeout(() => {
  stopSpinner(`Done`);
}, 2000);
However if you change the order and FileWriter will come first, only print function will be exposed, since this is the only function that FileWriter provides:
import { info, InteractiveWriter, FileWriter, composeWriters } from 'cli-tag-logger';

const { print } = composeWriters(
  new FileWriter(),
  new InteractiveWriter()
);

print(info`I'm the only function available`);If you want to create your own writer, you need to extend abstract Writer class and implement onPrint function:
import { success, Writer } from 'cli-tag-logger';

class StderrWriter extends Writer {
  onPrint(message: string) {
    process.stderr.write(message + '\n');
  }
}

const { print } = new StderrWriter();

print(success`This will be printed to process.stderr`);
You can compose your custom writer with predefined ones:
import { success, Writer, FileWriter, composeWriters  } from 'cli-tag-logger';

class StderrWriter extends Writer {
  onPrint(message: string) {
    process.stderr.write(message + '\n');
  }
}

const { print } = composeWriters(
  new StderrWriter(),
  new FileWriter('output.log')
);

print(success`This will be printed to process.stderr and to a file`);


